Chapter 3 doesn't need to be read in sequence!
Think of it as a reference document that you can consult as needed.
Learning Goals
As you create images in various situations, you'll encounter times when you need to pay attention to the 'image size.'
Let's learn some tips on how to decide the image size and what techniques you can use.
Plain Text
복사
Determining Output Image Size Based on Aspect Ratio
Latent Size
We explained what Latent is in 2-2.
Since the latent size can only be set to multiples of 8, if you enter a width of 519, it will automatically round up to 520.
You don’t always need to be conscious of multiples of 8 for image sizes as it adjusts automatically; just keep it in mind.
Recommended Image Ratios by Model
SD1.5 (512)
For the SD1.5 model, the optimal size is generally 512x512, with some allowing up to 768x768. Thus, the common aspect ratios for SD v1.5 are:
•
1:1 (Square): 512x512, 768x768
•
3:2 (Landscape): 768x512
•
2:3 (Portrait): 512x768
•
4:3 (Landscape): 768x576
•
3:4 (Portrait): 576x768
•
16:9 (Widescreen): 912x512
•
9:16 (Portrait): 512x912
SDXL (1024)
For the SDXL model, the optimal size is 1024x1024, and the common aspect ratios are:
•
1:1 (Square): 1024x1024, 768x768
•
3:2 (Landscape): 1152x768
•
2:3 (Portrait): 768x1152
•
4:3 (Landscape): 1152x864
•
3:4 (Portrait): 864x1152
•
16:9 (Widescreen): 1360x768
•
9:16 (Portrait): 768x1360
The main reason SD1.5 and SDXL have different image sizes is that these models were trained with images of different sizes during their training phase.
(If we use a metaphor: SD1.5 sculptors practiced only with 512x512 marble, while SDXL sculptors practiced with 1024x1024 marble, so it might be challenging to create proper sculptures with marbles of different sizes.)
Upscaling
Therefore, if you want an image with a resolution of 2048x2048, you will need to perform upscaling. This will be covered in 4-5.
Asking ChatGPT
You can use the ratios mentioned above, but it's also okay to ask ChatGPT for simple elementary math ratio calculations.
Convert Input / Resize
(This feature is useful in various situations, including when you study ControlNet later.
It is a function that can be effectively used in ControlNet and other scenarios.)
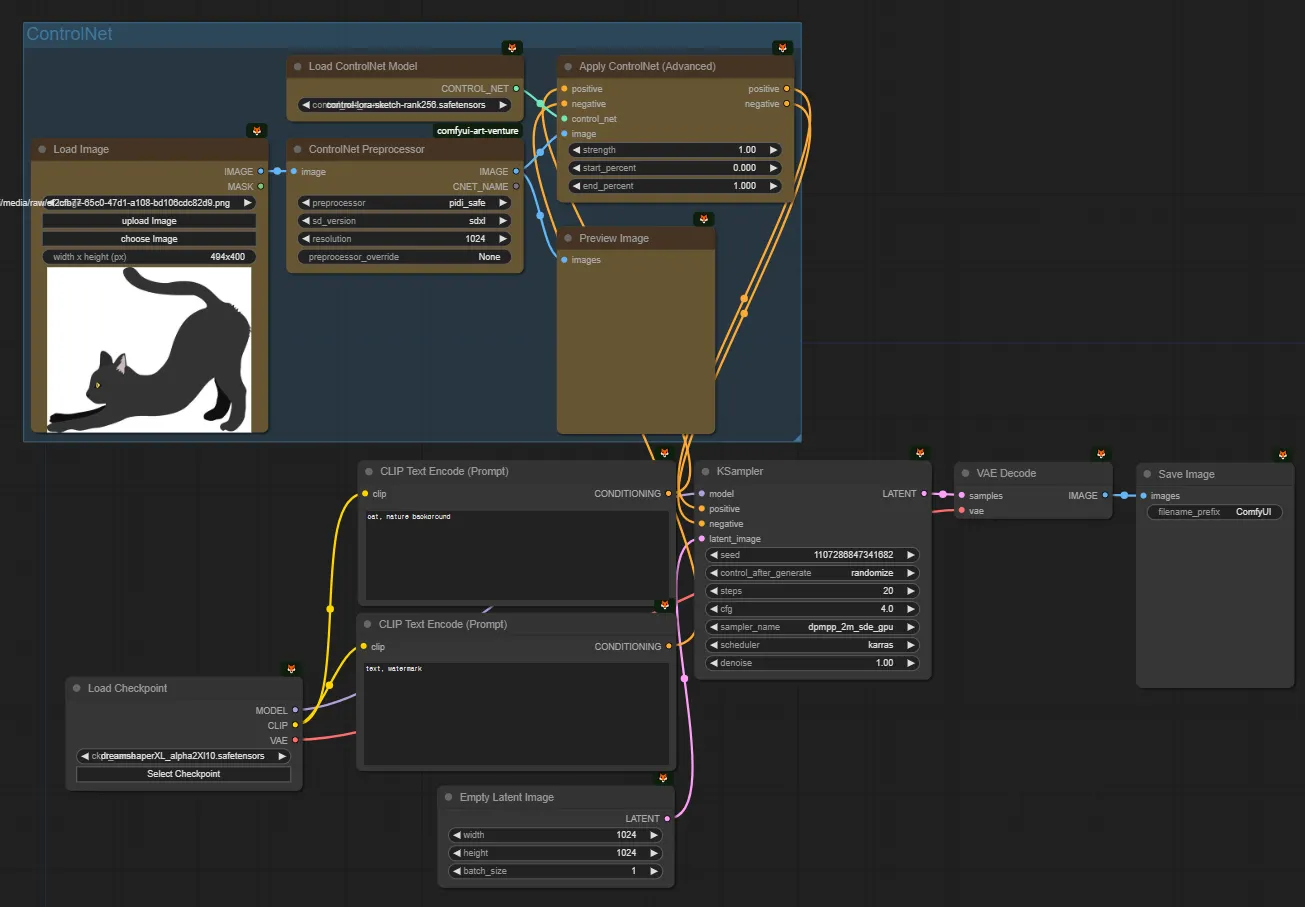
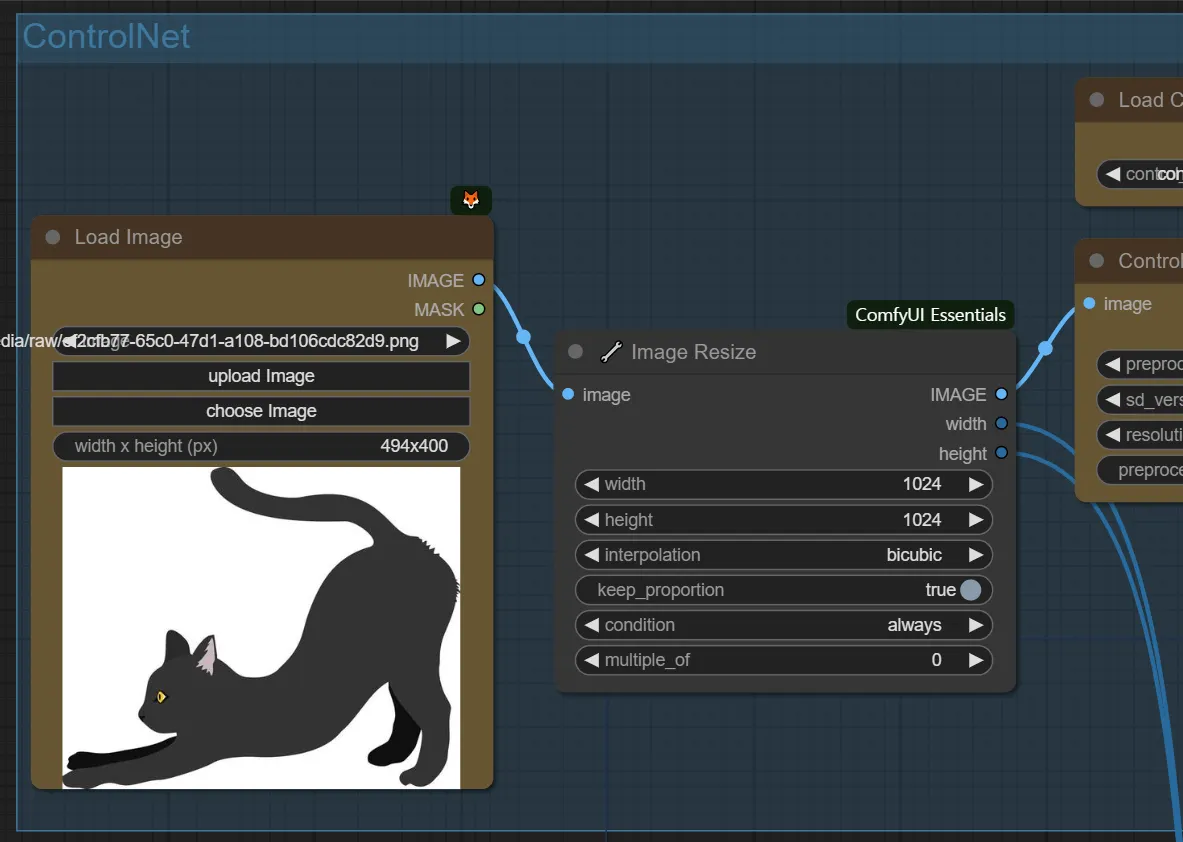
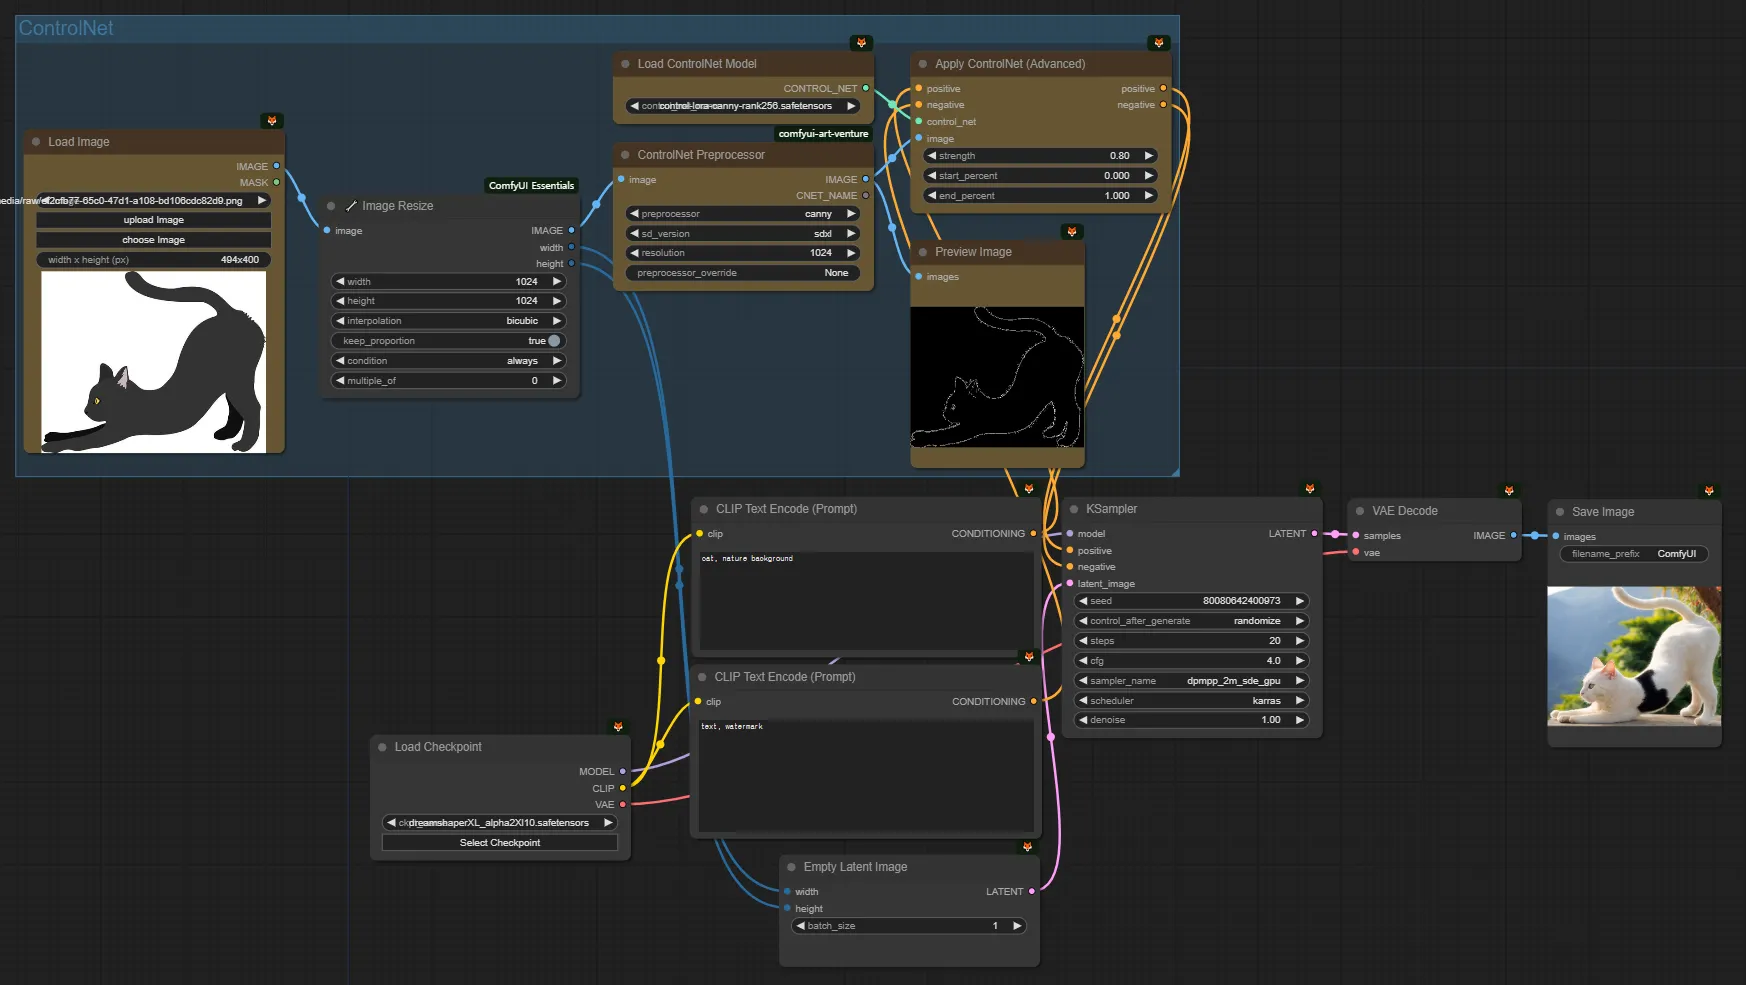
Looking at this workflow, it involves inputting an image with a ratio of 494x400 and then generating an image of 1024x1024.
If the ratio and size do not match, there may be errors or issues with the process.
Avoid using overly large 4K images or images with poor quality. Instead, resize to a suitable size (512x512 to 1024x1024) before inputting.
When resizing, use bilinear or bicubic instead of nearest, as they offer better performance.
Also, setting keep proportion → true ensures that the longer side is adjusted to 1024 while maintaining the aspect ratio.
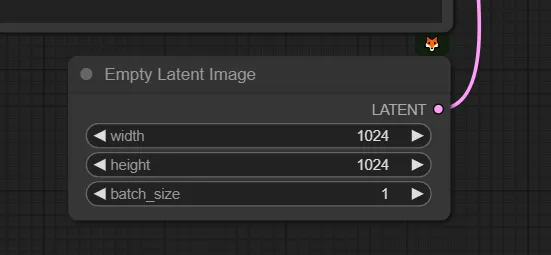
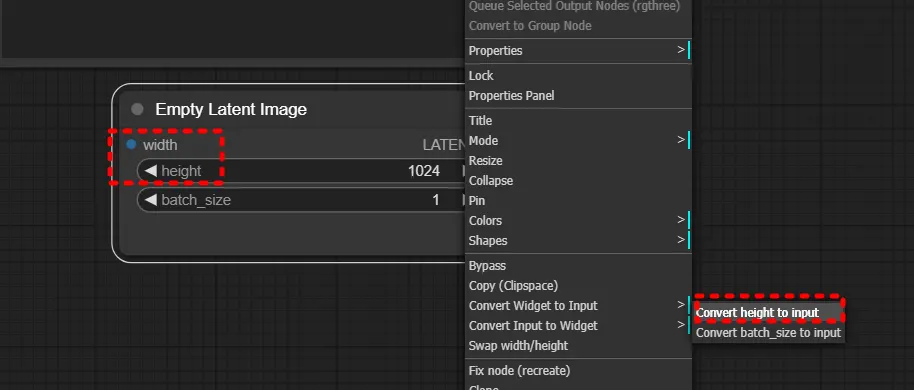
For the empty latent image below, it can be tedious to always adjust to the correct ratio.
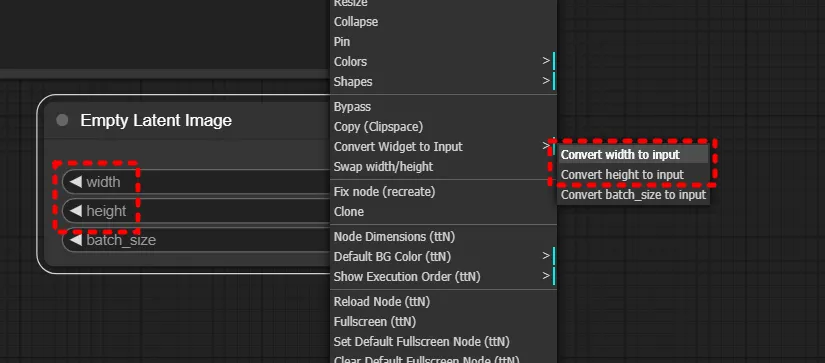
To streamline this process, right-click and find convert … to change the width and height inputs from widgets to direct input fields.
Then, connect the output width and height from the resize operation, and it will be complete.
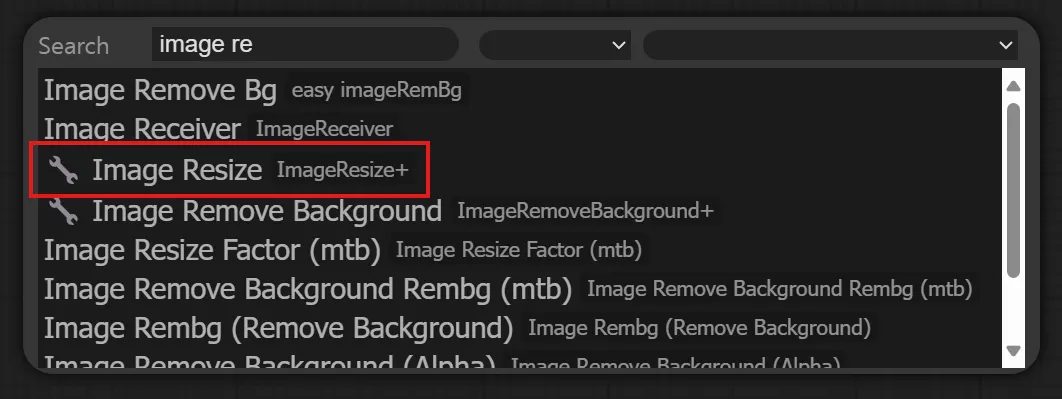
Currently, ComfyUI offers various Image Resize nodes, but for general use, I recommend the Image Resize node with the wrench icon at the front.
Image Resize Node
Image Resize
You can freely adjust the size of the input image.
Connect it to the IMAGE output of the Load Image node to receive the input image.
width
Enter the desired width.
height
Enter the desired height.
interpolation
Choose the method for resizing the image.
Although nearest is recommended by default, if you are reducing the size of the image, area is better.
keep_proportion
Aspect ratio maintenance option.
Set to true to resize while maintaining the aspect ratio.
Set to false to resize without maintaining the aspect ratio.
condition
Choose when the Image Resize will be executed based on the image input.
•
always: Execute Image Resize regardless of the image input.
•
downscale if bigger: Execute Image Resize if the image is larger than the set value.
•
upscale if smaller: Execute Image Resize if the image is smaller than the set value.
Example
•
width = 1024
•
height = 1024
•
interpolation = nearest
•
keep_proportion = true
•
condition = always
With these settings, regardless of the input image size, the larger dimension will be resized to 1024, and the other dimension will be resized proportionally.
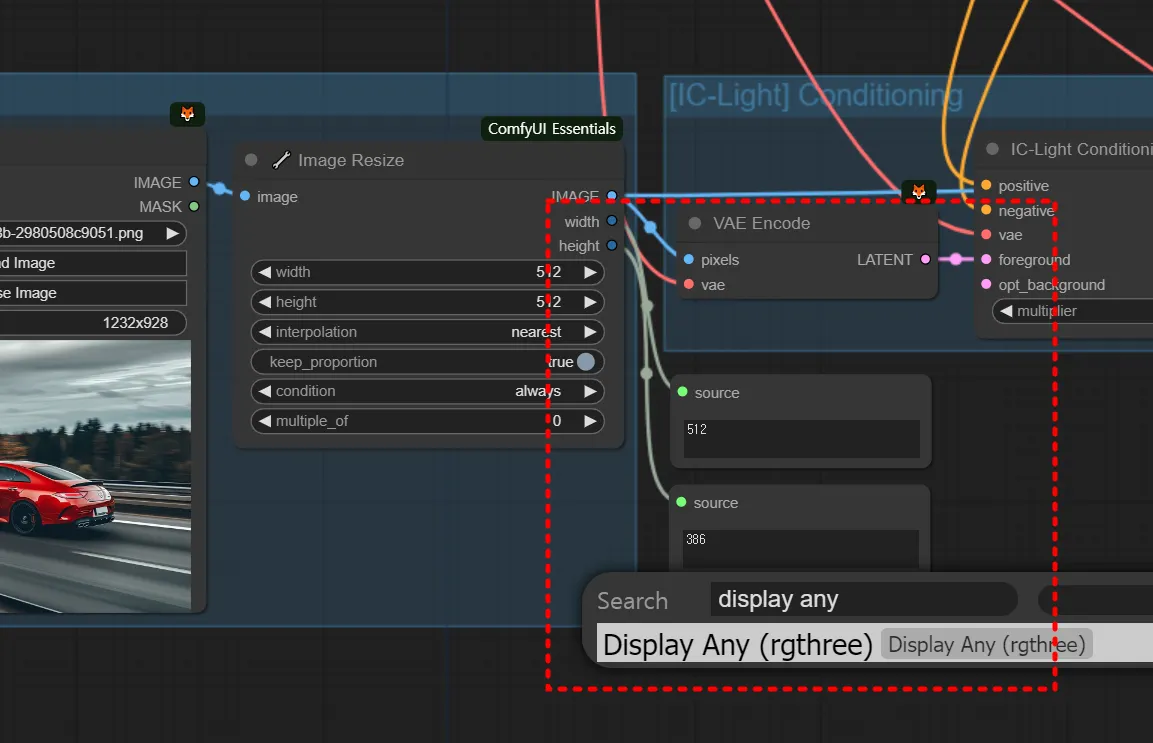
(Note) Common Image Size Mistakes (6-1. Relight)
When resizing a 1232x928 image to 512x512 while keeping the proportion, the longer side will be adjusted to 512, resulting in 1232:928 = 512:x, where x = 385.66.
This causes the image to become too small. To check the image size, use nodes like display any to view the values.
So, the resize ratio was changed to 768x768. You can see that the image has greatly improved.

